Actions and Scripts in Adobe Photoshop
No doupt, Adobe Photoshop is one of the most powerful and flexible products for image processing. One of it’s strengths is the possibility to automate repeating processes. In this article, I not only discuss the well-known “actions” but also the lesser known, but even more powerful “scripts”. I’ll show you how you can speed up you workflow using these thrilling concepts.
We all know this: Coming back from a fine and productive shooting, the camera bag full of stuffed memory cards. Now it’s time for sorting and editing the prey. The best images are to be shared with friends, via facebook, flickr, the own website, in one of the many communities, or simply through mail.
But in the end, we are sitting in front of the computer the whole evening, being frustrated about all the time lost for this – partly boring – work. And then, much of the work is always the same, or at least very similar, for each and every image.
For example, we want to check the contrast for all images, some of them will need some sharpening. Maybe you even have your very own personal style to apply. At the end, all photos are to be scaled down to a certain size and shall get a small copyright note. By using actions and scripts, it is very easy to automate this process, which saves time and helps not to forget important steps.
Actions
The sequence of the steps can easily be changed, and you can remove existing or add new steps. You can define, whether dialogs shall be opened, allowing you to change some input values. You can also add message boxes through which you can easily stop further execution of the action. And all this is available at your fingertips, directly within the Photoshop GUI and without any programming skills.
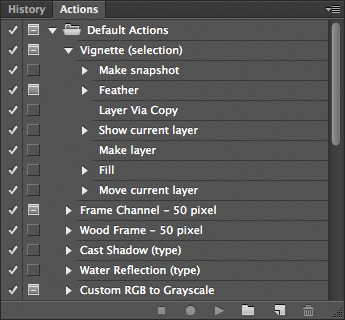
All actions are listed in the action window (). They can be grouped and organized in action sets, and it is possible to export a complete action set to a file, allowing you to sync you’re actions between different computers, or to share them with friends and colleagues. At the bottom of the actions window, there is a little toolbar with buttons for creating, recording, playing and deleting actions.
Our first action
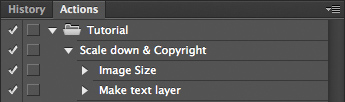
First of all we create a new action set named “Tutorial” (fourth Icon from the left ![]() ). This will contain all actions of this tutorial.
). This will contain all actions of this tutorial.
![]() ). Recording starts automatically. Now
open the dialog and set the width to 600 pixel. After that, activate the text tool (key T), click at
a position near to the lower left corner and enter a short text. Then stop recording (first icon in the toolbar of the action window). Done. Our first own
Photoshop action is now ready to be used.
). Recording starts automatically. Now
open the dialog and set the width to 600 pixel. After that, activate the text tool (key T), click at
a position near to the lower left corner and enter a short text. Then stop recording (first icon in the toolbar of the action window). Done. Our first own
Photoshop action is now ready to be used.
To test it, we open an other image, select the new action and click on the play button. The image gets scaled down and the previously entered text appears in it’s own layer.
Interactive Actions
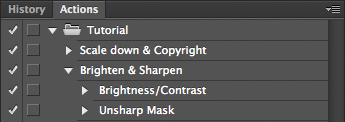
Now we create a second action called “Brighten & Sharpen”. In the first step, open the dialog . Increase brightness to 30 and click in OK. Now open the dialog , enter some suitable values and click OK. Now stop recording. Second action ready.
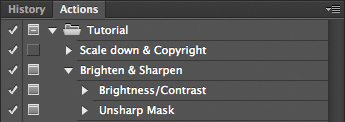
This time, both dialogs are displayed and we can change the values during execution. The changed settings are applied to the image, but not saved to the action. Next time we play the action, the dialogs will again show the default settings stored in the action.
Combine Actions
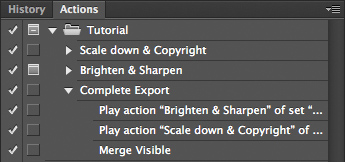
Batched actions
We’ve now created a short little workflow with a few actions. This workflow can be applied on a single image, but it might be even more effective to apply it through batch processing to a bunch of images. Therefore open the dialog . Select the action set “Tutorial” and the action “Complete Export”, then define the source and destination folder and click OK. Photoshop will now load all images in the source folder one by one, apply the action on each of them and save the result in the destination folder. Depending on the number of images, this may take some time, but it’s certainly a lot faster then doing everything manually.
The techniques discussed so far already show the power of Photoshop actions. A whole workflow can be defined through actions and can be used with just a single click. Thanks to the possibility to enable or disable dialogs, we can control, which steps of the workflow shall be the very same each time, and which steps shall allow for interaction and further control. By referencing “sub-actions” we can structure the workflow and we can define different workflows which share parts of the process. Think of shooting with different cameras. Some may need some brightening like in our action, while others need more control through curves, or other default values for sharpening. But in the end, all images shall have the same size and copyright note.
Using batch processing, even large amounts of images can be handled in acceptable time and in a structured manner.
Some Problems remain
Everthing perfect now? Well, look at the result of the batch processing. Maybe you will see some drawbacks. Firstly, all images have the same width. The height might be different because of different aspect ratio. As a result, portrait images are a lot larger than landscape images. This is because we scaled the images based on the width, not the size of the largest side.
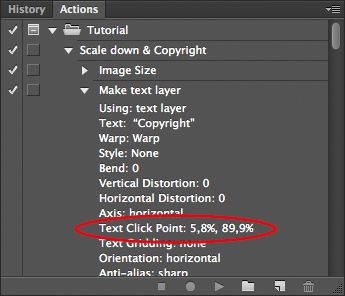
Let’s take a closer look at the content of the action which creates the text. Go to the action window and open the content of the respective step. You can see that the position of the text is stored in percent. And as some images are higher than others, the distance to the border changes.
Of course it would be possible to create new actions for portrait oriented images. And at least fo resizing, this would be acceptable. But as images may have very different aspect ratios, this would not work for positioning the copyright text. Besides, we would have to move all portrait images to a different source folder for batch processing. Certainly not very practical.
Instead we are in need for a more flexible solution, which would allow us to control the various steps depending on information from the images to be processed. And this is what scripts can do for us.
What is a script?
A script in Photoshop is a real programm, written in a real programming language. But don’t be afraid, you will soon see that this is quite easy.
Adobe Photoshop supports scripts in three different programming languages:
- JavaScript (Windows & Mac)
- Visual Basic (Windows only)
- Apple Script (Mac only)
As all examples shown in this tutorial are supposed to run on both platforms, we use JavaScript here. The range of functions is the same in all three languages, with one exeption: Within a script you can call other existing scripts. But these called scripts have to be written in JavaScript. There is another advantage of JavaScript we learn about at the end of this tutorial.
The first Script
01 var doc = app.activeDocument;
02 app.preferences.rulerUnits = Units.PIXELS;
03 // Position of the Text
04 var top = doc.height – 30;
05 var left = 30;
06 // Font solor
07 var white = new SolidColor();
08 white.rgb.red = 255;
09 white.rgb.green = 255;
10 white.rgb.blue = 255;
11 // Create a new text layer
12 var layer = doc.artLayers.add();
13 layer.kind = LayerKind.TEXT;
14 var layerText = layer.textItem;
15 layerText.contents = ‘Copyright’;
16 layerText.size = 14;
17 layerText.color = white;
18 layerText.position = new Array(left, top);
The box shows a first small script, which does more or less the same as the second step of the “Scale down & Copyright” action discussed earlier. You can save the code of the programm (of course without line numbers) in a text file called „Copyright.jsx“ and put it into the scripts folder of Photoshop. It’s called „Presets/Scripts“ whithin the application folder.
If you copy the content of the script from this page, please take a look at the notice at the end of this article.
The file can be created with any text editor. But I recommend using Adobes ExtendScript Toolkit. This editor offers direct access to the command reference and scripts can be started from within the editor. This is very handy when it come to searching for bugs and errors. You can set breakpoints at which execution of the script is stopped, and you can see step by step what the script really does.
All scripts shown here can be downloaded. The downloaded scripts contain some for features not shown here. Therefore the line numbers do not match. But the scripts are documented in detail.
Once you have stored the file, restart Photohop. In the menu you will find a new menu item . Now open an image and select the menu item. You will get a new text layer with the copyright note.
Contratulations! You’ve just created and tested your first Photoshop script.
Let’s take a closer look at the script. In the first line a new variable is created, which gives us access to the active document in Photoshop. Line two changes the internal units of Photoshop to pixels. Without this line, the units defined in the preferences under would be used. As we don’t want a random result, we change to units here.
Line number three is a comment. Comments are marked by two slashes (//). Photoshop ignores everything behind the slashes up to the end of the line. Comments can start also in the middle of a line. They can be used for documentation or to comment out single commands.
Lines seven to ten define the color used for the text. From line 12 on, we come to the important part. Firstly, a new layer is created in the document. Then the type of the layer is changed to a text layer. Line 14 gives access to the text information of this layer. We change the content of the text (line 15), set the font size (line 16) and the color of the font (line 17), and finally the position (line 18). All other properties which could be set for texts, like alignment or font type, will use the default values. For example, if you comment out line 17, the current foreground color would be used for the text.
When we run the script for different images, we’ll see, that the text always appears at the very same position based on the lower left corner. The size and aspect ratio of the image doesn’t count anymore. We solved one of the two problems we had with our actions-based solution.
Improved Scaling
Next, we go on with the second problem. We want to scale down an image in such a way, that its longest side will be 600 pixels. The code is displayed in the box.
01 var storedUnits = app.preferences.rulerUnits;
02 app.preferences.rulerUnits = Units.PIXELS;
03
04 var doc = app.activeDocument;
05 var origSize = Math.max(doc.height, doc.width);
06 var factor = 600 / origSize;
07 var newHeight = doc.height * factor;
08 var newWidth = doc.width * factor;
09
10 doc.resizeImage(newWidth, newHeight,
11     doc.resolution, ResampleMethod.BICUBIC);
12
13 app.preferences.rulerUnits = storedUnits;
Similar to the first script, we change the internal units to pixels. But before this, we store the current settings in a variable (line 1). This allows us to re activate the orignial setting at the end (line 13). This has nothing to do with scaling, but by doing so, we do not destroy any user user settings.
In the main part the script first determines the length of the largest side (line 5) and calculates the scaling facter (line 6). This factor is then used to calculate the new dimension of the image (lines 7 & 8), and finally the image gets resized (lines 10 & 11). When resizing, you have to define the resolution of the image. We don’t change it here, just taking the current value. Besides, the resample algorithm has to be defined. You can use the same values as you can select in the dialog . The exact names of the other values can be found in the reference documentation or in the downloadable scripts.
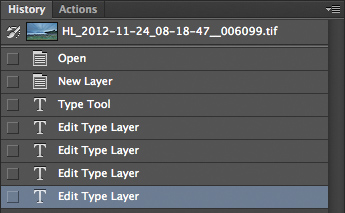
Both scripts shown so far solve the problems we had with actions. However, the solution is not really nice yet. For example, when we run the copyright script, we notice that the history shows a lot more steps compared to what the action did. Nearly every single command of the script is recorded as a single step in the history. When using larger scripts, this could be a mess.
01 /*
02 If debug is set to ‘false’, the script will
03 be executed in a single history step.
04 */
05 var debug = true;
06
07 var message = ‘Copyright’;
08
09 function addCopyright() {
10     var doc = app.activeDocument;
11     app.preferences.rulerUnits = Units.PIXELS;
12     // Position des Textes
13     var top = doc.height – 30;
14     var left = 30;
15     // Font color
16     var white = new SolidColor();
17     white.rgb.red = 255;
18     white.rgb.green = 255;
19     white.rgb.blue = 255;
20     // Create a new text layer
21     var layer = doc.artLayers.add();
22     layer.kind = LayerKind.TEXT;
23     var layerText = layer.textItem;
24     layerText.contents = message;
25     layerText.size = 14;
26     layerText.color = white;
27     layerText.position = new Array(left, top);
28 }
29
30 if (debug) {
31     addCopyright();
32 } else {
33     app.activeDocument.suspendHistory(
34         ‘Add Copyright’, ‘addCopyright();’);
35 }
The box shows the reworked version of the copyright script. When you edit the existing file, you don’t have to restart Photoshop. All changes are active as soon as you safe the file.
The header of the new version shows a multi-line comment. Such comments are enclosed in /* and */.
In line 5 a variable is defined, which is used to control the way of execution of the script. This control is not necessary, but it helps testing the script. As long as you are working on the script, set the value to true. Once you’fe finished, change it to false.
Line 7 defines a variable containing the text to be displayed in the image. This makes life easier, if we want to change the text some time in the future. We will find the text more easily and can change it without touching the rest of the programm code.
The lines 9 to 28 define a new function named addCopyright. The content of the function is the same as in the first version of the script. Only line 24 has changed, as the command now uses the previously defined variable for the text.
The way of execution is controlled in lines 30 to 35. If the variable debug is true, the script simply calls the method defined above (line 31). The behaviour of the script is the same as the first version.
But when we change debug to false, line 34 gets executed. This command suspends the history protocol and executes the function in one single history step. The first argument is the text to be displayed in the history, the second argument contains the JavaScript code to be executed. Of course it is not neccessary to run the whole script in only one step. You could also decide to use this only for parts of the process. The possibility to control what appears in the history not only helps to unclutter the history, it is also a nice way to keep the workflow more private when it comes to distributing your scripts. You can control the way, other people will see what your script does. This also is a great benefit of scripts above actions. With actions, everybody always sees, how you solved a certain problem.
The second version of the copyright script demonstrates a few more things worth to be noted. Using functions is a good way to structure the code, which helps keeping a better overview and gives the possibility to re-use pieces of code. In addition we saw, how execution of a script may take different paths depending of certain conditions. You can see more examples of this technique in the downloadable scripts. The script “ConditionalResizing.jsx” demonstrates how to take into account the image ratio. When used with panoramas, the script allows other sizes than with standard formats. The script “StepwiseScaling.jsx” scales the images in several small steps.
Enhanced usage of scripts
Software-wise our scripts are ready to be used. But we can improve their usage.
Up to now, the text displayed in the menu depends on the filename of the skript. It would be nice to have more control about the text. Next to this, we want to define the menu in which the item shall be displayed. Both can be done by including a special comment giving Photoshop some additional meta info about the scripts.
The comment is a short XML-section. XML is a well-known languange for defining structured information. All data is enclosed in so-called “tags”, which are written in angle brackets. The meta comment for Photoshop is enclosed in the tag „javascriptresource“. It is best-practise to add this comment in the header of the file. Photoshop is only able to find it, if it is contained within the first 10240 characters of the file. Only this part is loaded during startup of Photoshop. Don’t forget to restart Photoshop, if you make any changes to this comment.
/*
<javascriptresource>
<name>Scale Down</name>
<about>Sample script for downscaling of images.</about>
<menu>filter</menu>
<category>Tutorial</category>
<enableinfo>true</enableinfo>
</javascriptresource>
*/
The tag “about” contains a short description of the script. If you add this tag, a new menu item appears in the menu Help > About Plug-Ins (Mac: Photoshop > About Plug-Ins). This item opens a simple message dialog with the content of the about tag.
The tag “menu” is used to define the menu, in which the menu item of the script shall appear. At the moment, only three possible values are allowed here:
- filter – The script appears in the menu Filter.
- automate – The script appears in the menu File > Automate.
- help – The script appears in the menu Help.
If the tag “menu” is omitted, the script appears in the menu File > Scripts.
You can group your script using the tag “category“. All scripts with the same category are grouped together in the menu and are separated from other menu items. The name of the category doesn’t matter, it is not displayed at all.
The tag “enableinfo” is used to control whether the menu item shall be activated or de-activated. If the tag is omitted, the menu item is always enabled. If the tag only contains true, the item is only enabled, if a document is loaded in Photoshop. This is good for all our scripts, because runnng the script without a document would result in an error message. But it is also possible to specify more detailed conditions here. For example, some scripts may only be called for RGB images and not for grayscale or CMYK images, while other scripts may require an active selection. The scale-down script in this tutorial may have the following condition:
<enableinfo>max(PSHOP_ImageWidth, PSHOP_ImageHeight) > 600</enableinfo>In this case, the script is only available, if the largest side of the image is larger than 600 pixel (PSHOP_ImageWidth and PSHOP_ImageHeight always use pixel, regardless of the settings defined in Photoshop.). A more detailed description of the conditions can be found in the Photoshop JavaScript Reference.
Automated Scripts
We learned two different ways to automate and simplify our workflow in Photoshop. Actions are for sure easier and faster to create and maintain, while scripts are more flexible and powerful. So what could be more natural than combining both ways?
An action may not only call the standard functions of Photoshop or other actions, but also our own scripts. Doing so, we can combine the convenience of actions with the power of scripts.
For this purpose we now create a new action “Complete Export 2”. First we call the action “Brighten & Sharpen”, then the scaling script and the copyright script. Finally the flatten the image. Done. We now have one single action representing our complete workflow composed of actions, normal commands and scripts. This action can be used for batch processing as show earlier, which allows us to treat all our images in the very same way, reglardless of their size and ratio.
Publishing Scripts
Once you have developed your own scripts, you may want to share them with others. But maybe you’re a bit afraid others could see the content of your scripts. In this case, Adobes ExtendScript Toolkit allows you to create a binary version of the script. The script then gets encrypted (and not only compiled like normal software) and can not be read or de-compiled. This way you can share you’re scripts while still keeping your code private.
Final words
This tutorial was ment as an introduction into the different ways of automation of processes in Photoshop. Several advanced topics are not covered here. For instance, scripts allow to access functions of other applications of the Adobe Photoshop Suite, like Bridge or InDesign. It is also possible to call any action or filter from within a script, and to define own dialogs to a script. These topics may be covered in a future second part of this tutorial.