Using Tangent Element with Capture ONE
When Capture ONE Pro 10 came out end of last year, one new feature caught my eye: The support of the Tangent Element retouching panels. I have been looking for panels like this for quite some time, but usually they all lack support for Capture ONE. And when I read the announcement, it was just a question of time. So, a couple of weeks ago, I bought the panels.
What is a retouching panel?
If you are familiar with image processing software, be it Lightroom, Photoshop, Capture ONE or such, you know that there a tons of tools and filters you can use. You only have to find them when you need them. Usually many of the tools can be reached by more or less hard-to-remember keyboard shortcuts, while for others you have to dive deep down the mists of the menu. To help you with shortcuts, you can even buy dedicated keyboards (Photoshop, Capture ONE) which have the tools marked on the keys.
Shortcuts or even dedicated keyboards are a great step, but using the tools often requires using the mouse to move some sliders. In the process of working on an image, this is a big distraction. Firstly, the tools require screen real estate, and secondly you have to move your eyes around to guide the mouse. You loose contact with the image.
This is where retouching panels come into play. They are dedicated input devices, providing buttons, knobs, trackballs or sliders for direct interaction with the image. Yes, you interact with the image, not with a certain tool.
Why using a retouching panel?
The most obvious advantage of using a retouching panel is speed. No need to open any tools in the software, no need to clutter the screen with dialogs, no need to hunt-and-push the mouse. Just press a button or turn a knob and you immediately see the result. After only a short time, you will gain muscle memory to quickly find the right button or knob without even looking at the panel. No distraction from the image anymore.
But it’s not only about the speed of using one dedicated tool. With the right layout of the panel, it is even possible to adjust several parameters at the same time and see the combined results as you go.
Tangent Element Bundle
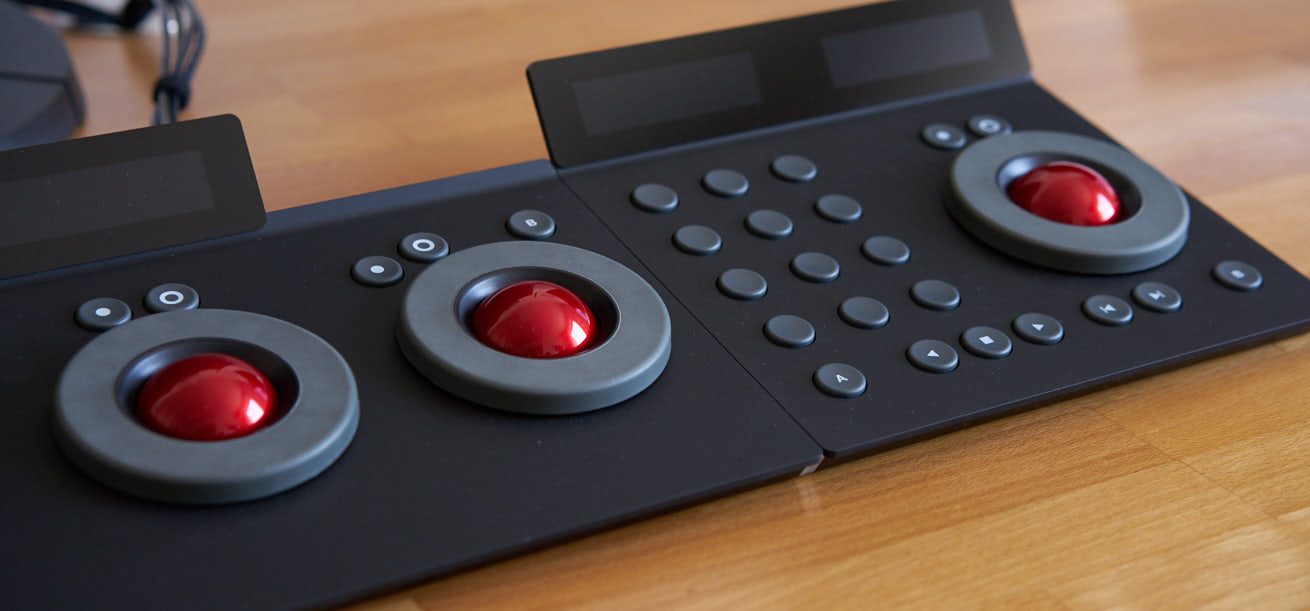
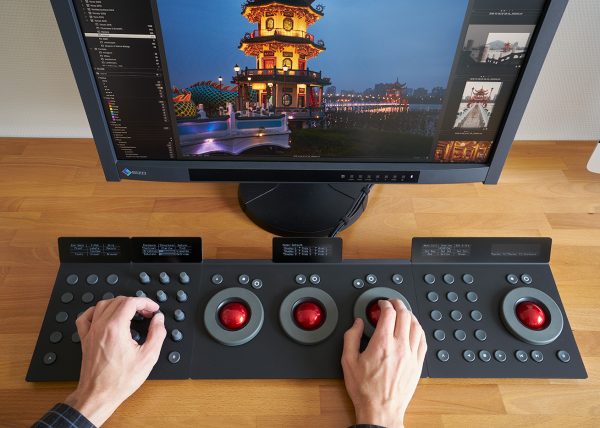
The Tangent Element set comprises four different panels, which can be combined in any manner. As long as you have enough desk space, you can use as many of each panel as you like. When put side by side the panels magnetically lock together. Each panel uses it’s own USB connection. If you use a USB-hub, make sure to use one with its own power supply.
Because I was unsure, which of the panels would suite my workflow best, I decided to order a bundle of all four.
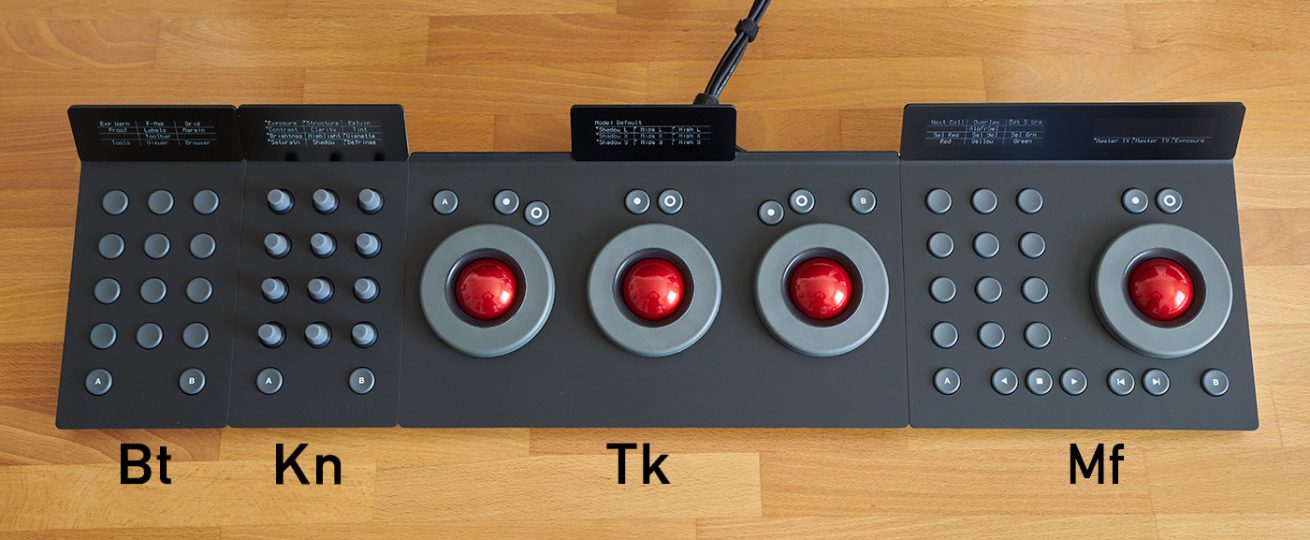
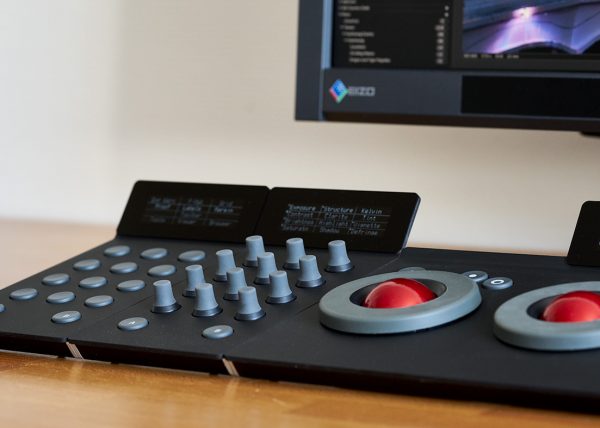
The compact panels feature a stylish, ultra slim design. The front side is about 1.5 cm high, the rear side 4.5 cm (8 cm incl. display). The complete panel is 77 cm (30.1 in) wide. The cases are of solid aluminium, the top surface is made of a very touch-pleasant plastic. All buttons provide great haptic feedback. The knobs, trackballs and rings run smoothly. A little bit more tension would be nice, as I sometimes accidentally turn a knob unintentionally.
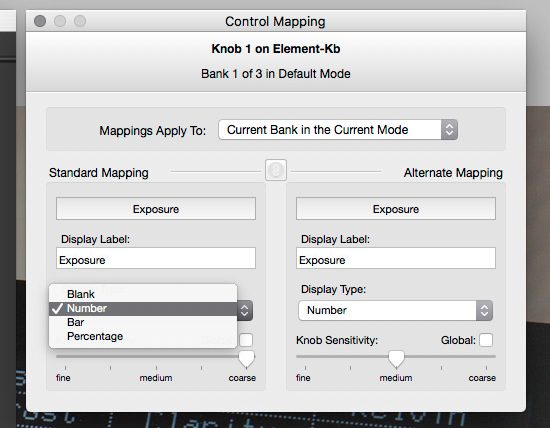
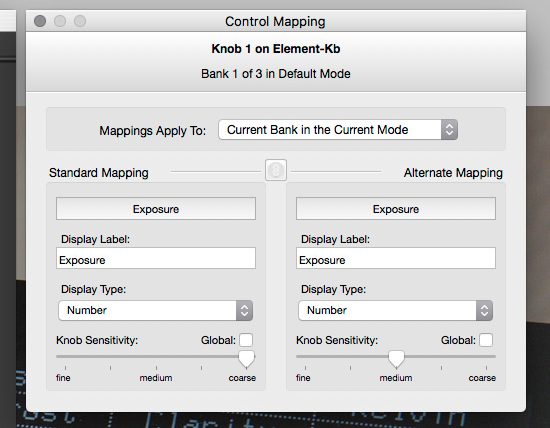
When you look at the panels, you will notice that most of the controls do not have any tags or icons. Instead, each panel has a high contrast, high resolution OLED display, which indicates what each control does. Using the Tangent Mapper software, you can customise the layout of the controls and even change the text of the label.
While using the knobs, trackballs and rings, the display shows either a progress bar, a percentage value or the real input value.
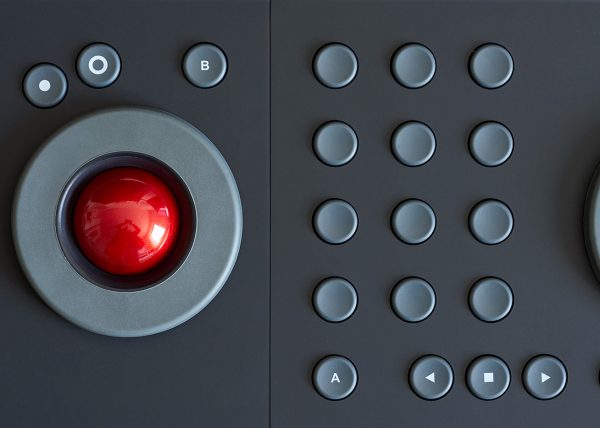
Each panel has two special buttons, labelled “A” and “B”. In default layout the “A” button is similar to the “Shift” or “Alt” key of you keyboard: While pressing this button, the layout of the panel switches to an alternate layout. The “B” button is used to step through different so called “banks” of layout. This is more like the “Caps-Lock” key: You don’t have to press and hold. In the Tangent Mapper you can configure whether the “A” and “B” keys shall refer to all panels simultaneously, or separately. You may configure as many banks as you like.
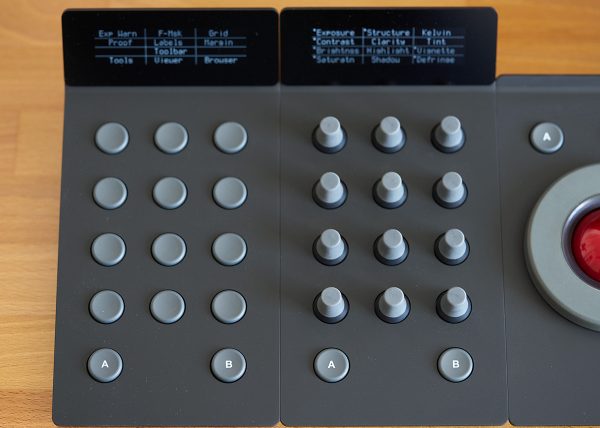
Bt – Button
The button panel provides, well, buttons. Twelve to be precise. This gives you 24 possible functions per bank. It’s right that this panel does not offer much over a normal keyboard, but this with a price tag a few times higher than a regular keyboard. However, in my usual desktop layout, the button panel is easier to reach while working through my images.
Kb – Knob
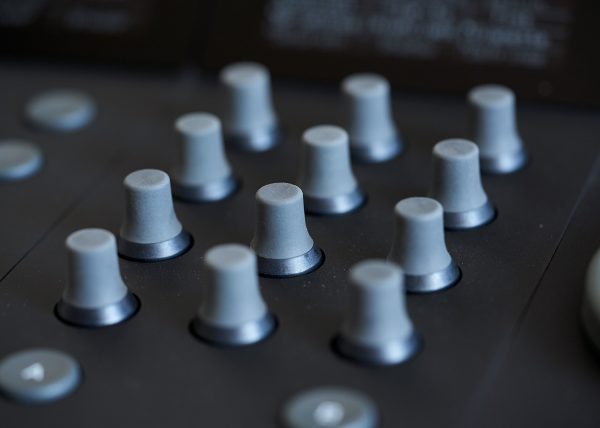
The knob panel provides 12 precise, high resolution knobs. Just like the button panel, this offers 24 functions per bank. Knobs are usually used for slider based tools like Exposure, White Balance, Clarity, Contrast, you name it. The mapping software not only allows you to customise the layout but also the sensitivity of the knobs. If you like, you may use the “A” button to toggle the sensitivity, which comes in handy for many tools that sometimes may need higher precision.
By pressing the knob, the tool is reset.
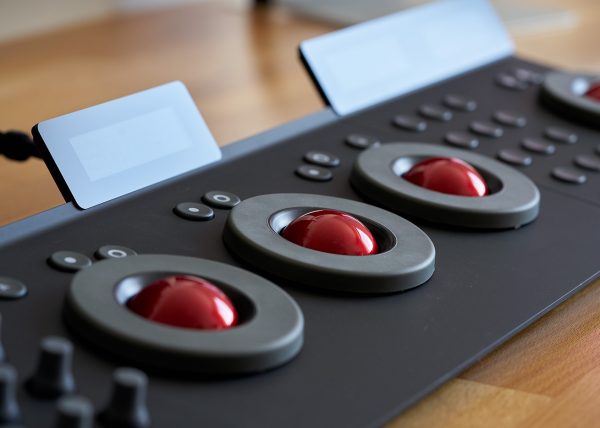
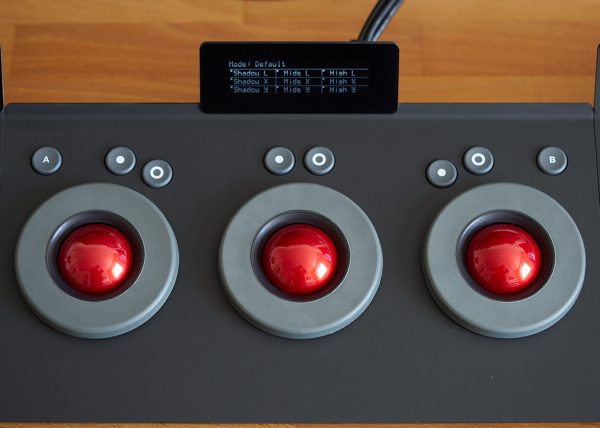
Tk – Trackerball
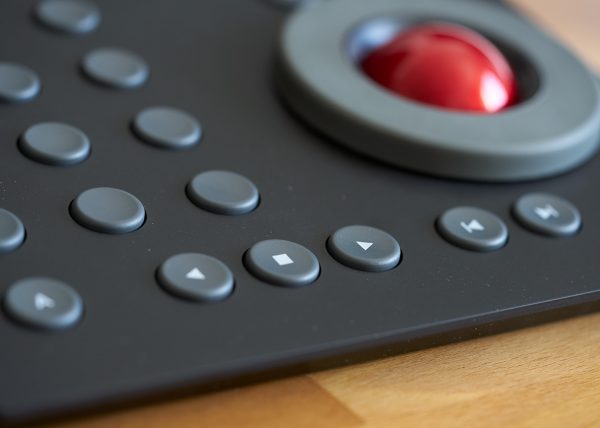
The Trackerball panel is the largest panel, three times wider than the knob or button panel. It offers three trackballs each with an additional third-axis ring. Above each ball, there are two buttons to reset the tool of the ball and the ring.
If you use the color balance tool in Capture ONE, this panel is the one for you. Once you used this panel, you will never want to go back to use your mouse or graphic tablet for color grading your images. It is just THE natural way. Serious.
With the trackballs you control the color balance of the shadows, midtones and highlights, while the rings are used to control the brightness. Pressing the “A” button increases the sensitivity of the controls, offering high precision control.
In the default layout, the “B” button is used to temporarily reset the color balance settings to easily compare before and after.
Although it is possible to map other tools to the Trackerball panel, to me color balancing is the only one that really makes sense. For all other slider-like tools, the knob panel is the better choice.
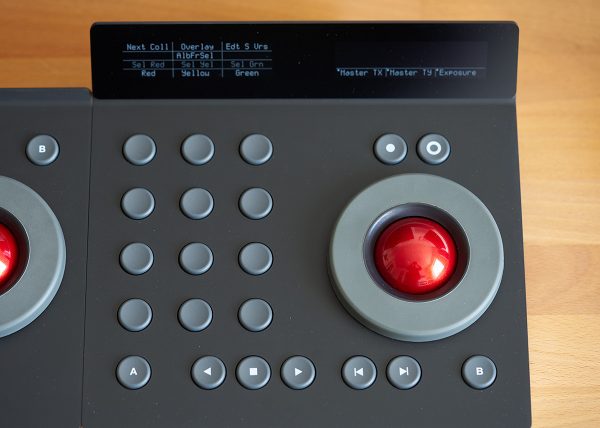
Mf – Multifunction
The Multifunction panel offers convenient ways for working with your catalog or session. It provides 12 programmable buttons like the Bt panel, one trackball with third-axis ring and five standard transport buttons, which are also programmable.
Customising
As already said, you can fully customise the panels to your needs. If you use the bundle, you have a total number of 24 buttons, 12 knobs, four trackballs, four rings, five additional standard transport buttons and eight buttons for mode- and bank switch. Both the transport buttons and the switch buttons are fully programmable just like any other button.
Endless Possibilities
For each button, you can select one out of more than 400 functions. Each knob as well as each ring can be programmed with one of 60 different functions. And each trackball can use two of these 60 functions (one for X-axis, one for y-axis). Additionally, each control can simply emulate a keypress.
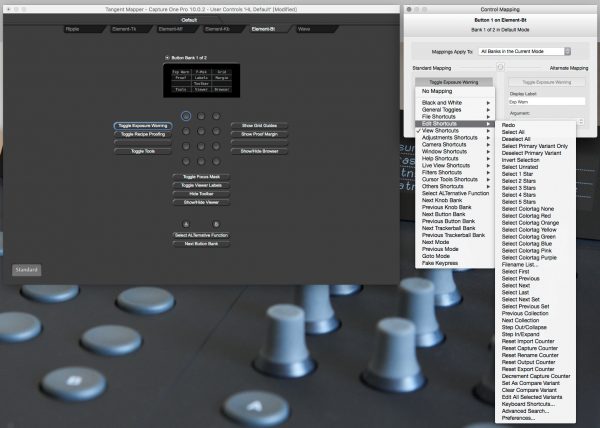
The number of possibilities is enormous. I can only recommend to spend some time thinking which functions you usually use, where to place them best. You can even configure several different mapping and switch between them using the mapper. This helps trying out different layouts to find the one that suits you best. Of course, this is also something that may change over time.
Using Banks
Configuring different banks is not only a way to add more functions to the panels. It is also a way to structure your workflow. For example, I have one bank for curating my images, selecting the ones I want to keep and mark the others to be removed. Once I’m done with this job, I switch to the next bank which focuses on editing images. There are another banks just for B/W editing, or for working with layers, masks and brushes.
Missing Features
Although the possibilities seem to be endless, there is one thing I really miss: There is no function to pan the image. At the moment, I haven’t mapped the trackball of Mf panel. The ring is used to zoom, and it would be great to use the ball to pan around. For this I still have to use the mouse, very inconvenient.
Another missing minor feature is filtering images based on rating. You can use a button to filter images with a certain rating, but there is no chance to filter images with a minimum rating. Sure, you can define a smart album for this, but you can not activate it with a button.
I already reported this to Phase ONE. We will see what happens.
Is it worth the costs?
It is right, the panels are not really cheap, although they are a lot cheaper than usual grading boards. As long as you don’t run for medium format, you can buy a camera and some lenses or other gear for the price of the Tangent Element bundle.
But: The panels are simply great. They bring your workflow to a whole new level. It is sheer fun working with them.
And even more important: You will speed up your workflow significantly, saving more time to go out and shooting.
Which one to buy?
Which panel you should try depends on your workflow. If you are using color balance a lot, than there is nothing better than the Trackerball panel. If you prefer using other tools, leave this panel out.
For more or less every workflow I can imagine, the Knob panel will be a real benefit. Using a dedicated knob instead of a slider is way more natural.
The Multifunction panel is useful especially for curating images and working with the catalog or session. However, for my workflow, the default mapping didn’t really made sense, so I build my own mapping completely ground up. And at the moment, I don’t really use the trackball. As long as panning is not supported, I can’t think of any function which would really fit. In the default mapping, this ball is used to control the overlay image, which is only useful when shooting tethered, which i rarely do (and even if I do, I don’t need any overlay).
The Button panel will give you not much benefit over a normal keyboard. Although it may help reaching some functions more easily than a keyboard. Especially if you use the banks to organise your workflow (see above), the Button panel can be quite useful. Depending on the step in the workflow, usually only a very limited number of functions are needed. Putting them on the Button panel can really speed up working.
No drawbacks?
Well, there are some. First of all, even with these panels you will not be able to ditch your mouse, graphic tablet or keyboard completely. There are tasks where you always will need a keyboard, like any kind of text input (renaming images, editing meta data and such). Some tools like Levels or Curves and of course masks can not be controlled with these panels. You will still need a mouse or a graphic tablet for this. The same applies for drop-down menus or checkboxes.
On the other hand, the goal of using such panels is not to eliminate a keyboard or mouse. Both are great input devices – for specific tasks. But for other tasks panels like the Tangent Element are suited a lot better.
What about Support for other Applications?
If you are using Photoshop or Lightroom, I’m sorry for you. These applications are not supported. In this case the only way to use the Tangent panels is by simulating keyboard events, which is quite limited. You may want to look at other devices like Palette Gear.